 Explorbot
Getting Started
Explorbot explores your web app, plans tests, and runs them — no test scripts. This guide gets you from zero to your first test in about ten minutes.
The path is short: install, configure, tell it how to log in, then point it at one feature and let it work.
1. Install
Section titled “1. Install”npm i explorbot --savenpx playwright installYou need Node.js 24+ (or Bun), an AI provider key, and a modern terminal — iTerm2, WARP, Kitty, Ghostty, or Windows Terminal with WSL. For the full compatibility checklist, see Prerequisites.
2. Configure
Section titled “2. Configure”Run the setup wizard:
npx explorbot initIt asks for your AI provider, its API key, and your app’s URL, then writes everything for you: explorbot.config.js, an .env file with the key stored, and an output/ folder. No manual file editing.
The generated config keeps models simple — one line picks the recommended set for your provider:
export default { web: { url: 'http://localhost:3000', }, ai: { recommendedModels: 'openrouter', },};ai.recommendedModels fills every model role from the provider’s bundled recommendations. To pin a single role instead, write it as 'provider/model-id' — it overrides the recommendation:
export default { web: { url: 'http://localhost:3000', }, ai: { recommendedModels: 'openrouter', agenticModel: 'groq/openai/gpt-oss-120b', },};That shorthand — 'provider/model-id' — uses a provider package Explorbot ships, so nothing extra is installed. Bundled providers:
openaianthropicgooglegroqmistralopenroutersambanova
The other style is explicit: install a Vercel AI SDK package (npm i @ai-sdk/openai) and build the client yourself. It works for the providers above too, and it is the only way to reach one that isn’t bundled, a custom baseURL, or extra client options:
import { createOpenAI } from '@ai-sdk/openai';
const poolside = createOpenAI({  apiKey: process.env.POOLSIDE_API_KEY,  baseURL: 'https://inference.poolside.ai/v1',});
export default {  ai: {    model: poolside('poolside/laguna-xs-2.1'),  },};
Both styles mix freely across the three keys. See Providers.
Explorbot uses three models. Pick each one for speed and cost:
| Model | Config key | Used by | Pick |
|---|---|---|---|
model | ai.model | Tester, Navigator, Researcher — they read HTML and ARIA on every step | a fast, cheap model (e.g. openai/gpt-oss-20b:nitro) |
visionModel | ai.visionModel | screenshot analysis | a vision model (e.g. openai/gpt-5.6-luna) |
agenticModel | ai.agenticModel | Captain and Pilot — they read short action logs and make the big decisions | a smarter model (e.g. MiniMax 2.5, Grok Fast) |
Captain and Pilot barely use tokens, so a smarter agenticModel improves results for almost no extra cost. OpenRouter is the simplest start — one key, many models. To use OpenAI, Anthropic, Groq, or others, see Providers. For every config option, see Configuration.
Want to see Explorbot work before pointing it at your app? Run it on the sample app:
npx explorbot explore https://todomvc.com/examples/react/dist/You can also run it from the VS Code extension — pick a site, start a bot, and watch it test without leaving the editor. Full documentation lives at testomat.ai/docs/explorbot.
3. Tell Explorbot how to log in
Section titled “3. Tell Explorbot how to log in”Most apps need a login. Give Explorbot the credentials once, and it signs in on its own:
This saves a knowledge file under knowledge/. Explorbot reads it whenever it opens the login page. Use * as the URL pattern for knowledge that applies to every page.
To skip the login on later runs, add --session. Explorbot logs in once and restores the saved cookies next time:
npx explorbot start /login --session # logs in, saves the sessionnpx explorbot start /dashboard --session # restores it, skips loginKeep real secrets in environment variables, and handle cookie banners, modals, and test data the same way — see Customization.
4. Pick one feature to test
Section titled “4. Pick one feature to test”Don’t point Explorbot at your homepage. Start it on a single focused feature — a page with a clear, visible CRUD interface it can work with. Good first targets:
/admin/projects/posts/admin/users- any list-and-edit or settings page
A page where you can create, edit, and delete items gives Explorbot an obvious job and a clear way to tell whether it worked.
5. Run
Section titled “5. Run”npx explorbot start /admin/projectsThe browser runs hidden by default. Add --show to watch it:
npx explorbot start /admin/projects --showWhen the terminal UI opens, type /explore. Explorbot researches the page, plans tests, runs them, and repeats. To go one step at a time:
/research # analyze the current page/plan # propose test scenarios/test # run the next testWhat a successful run looks like
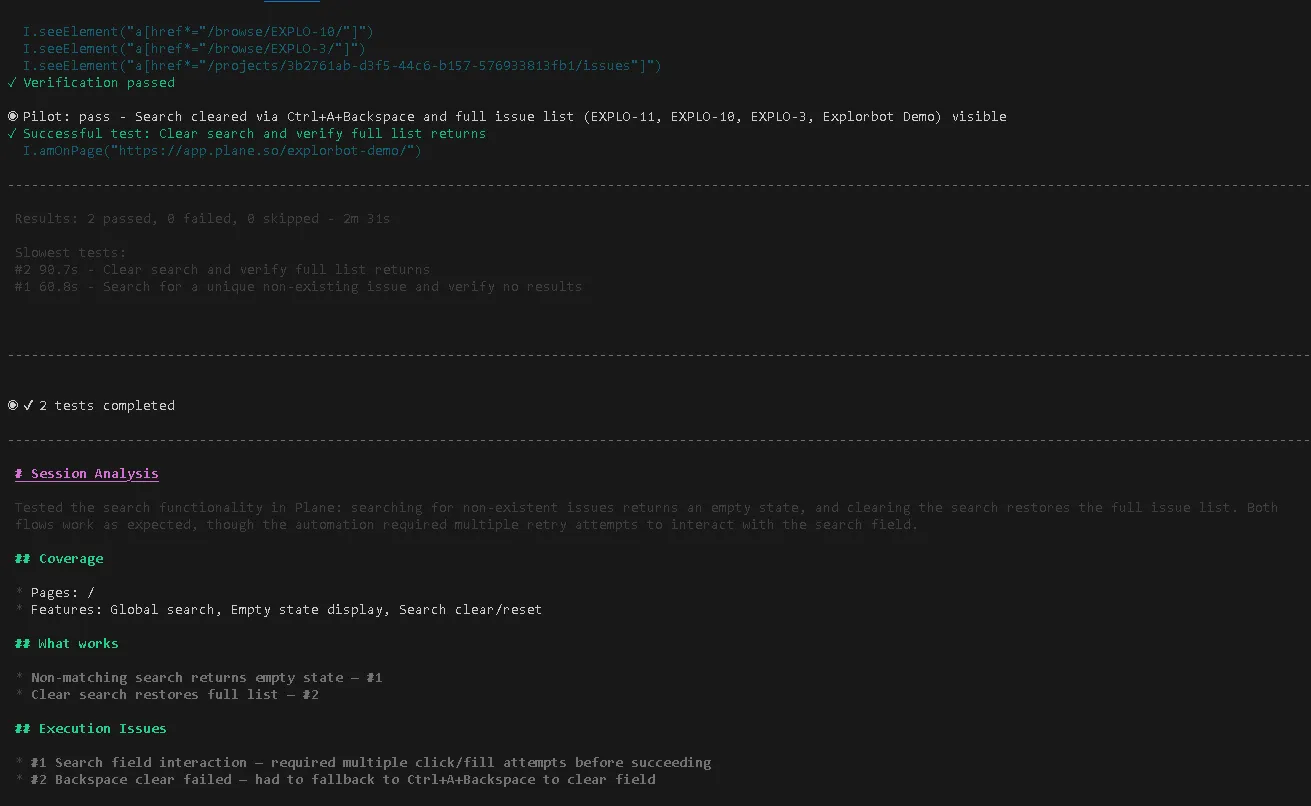
Section titled “What a successful run looks like”A completed exploration shows the test totals, a session analysis, the covered features, and any execution issues that need review:
The concepts
Section titled “The concepts”You have now touched everything Explorbot is built on. Here is the whole vocabulary, once:
- State — where the bot is: the page URL plus its main headings (
h1,h2). States anchor navigation, learning, and loop detection. - Research — reading a page. The Researcher agent maps forms, buttons, tables, and navigation into a UI map the other agents work from. Saved under
output/research/. See Researcher. - Plan — test scenarios invented from research, with priorities and expected outcomes. Markdown you can read and edit, in
output/plans/. See Test plans. - Test — one scenario executed step by step in the real browser. Passing tests are saved as runnable Playwright or CodeceptJS code in
output/tests/. See Automated tests. - Knowledge — facts you teach Explorbot: credentials, quirks, hints. Markdown files in
knowledge/, matched to pages by URL — you wrote your first one in step 3. See Knowledge. - Experience — what Explorbot learns by doing: failed attempts and the fixes that worked, saved in
experience/and reused on every later run. Knowledge you write; experience it earns. See Learning. - Agents — the AI workers behind each step: Researcher, Planner, Tester, Pilot, and more, each with its own job and model. See Agents.
- Report — the end-of-session summary of defects, UX findings, and coverage in
output/reports/. See Reporting.
Next steps
Section titled “Next steps”- Running Explorbot — the TUI you just used, the headless CLI, and when to use each.
- Customization — login, cookie bars, modals, and test data.
- Commands — every command, in the terminal and on the CLI.
- Knowledge — teach Explorbot more about your app.